Google+ gets full-size photo uploads, low-bandwidth Hangouts and more

Google hasn't forgotten about Google+, its fledgling social network. In a big year-end update, the search giant has added several new features, including a way to automatically upload full-size photos from an Android phone.
Users can enable full-size photo uploads in Google+ settings, by tapping on “Instant Upload,” then tapping “Set upload size.” The first 5 GB of full-size photo uploads are free. After that, users will have to buy more storage, starting at $2.49 per month for 25 GB of total storage.
As with before, users can auto-upload an unlimited number of photos at standard-size, with a resolution of 2048 pixels wide. Instant uploads appear in a private album on Google+, so they can be shared or just stored away for safekeeping.
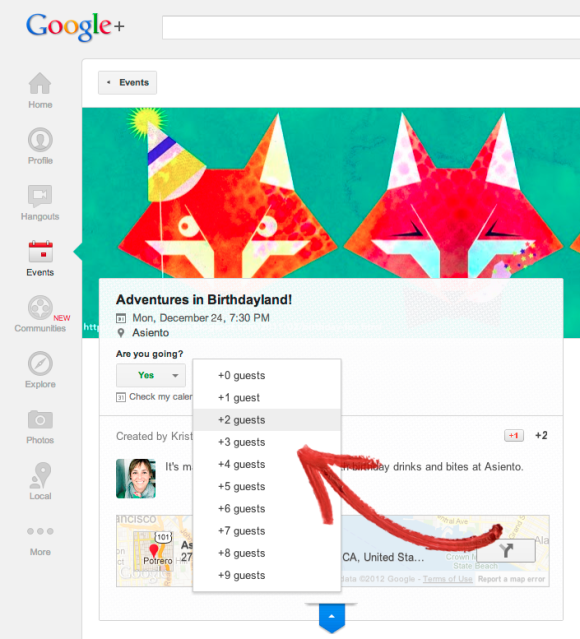
Google has also added some features to Events. To make invitations easier, users can copy and paste their event URL into an e-mail or IM, and after the initial invitation goes out, they can send follow-up messages and see who's viewed the invitation. Guests may now specify how many other people they're planning to bring.
The Google+ Hangouts group chat service is getting a couple small tweaks as well. The minimum bandwidth required is now 150 KB, which should help in areas with slow service, and for Hangouts on Air, broadcasters can hide the strip of video feeds on the bottom of the screen when there are no other participants.
For its iOS app, Google has tweaked the look and feel of the app and added some basic profile editing. For Android, the app now supports animated GIFs and birthday reminds in Google Now. Both apps can now provide notifications for updates from users' favorite circles.
Finally, Google is adding a couple of features related to Android 4.2. The 3D panoramas known as Photo Spheres will now appear in users timelines if they're using Android 2.2 or higher, and Android 4.2 users can now add a Google+ widget to their lock screens.
Although Google+ has a reputation for being a ghost town, Google said this month that the service has 235 million active users, including people who are doing things like +1'ing apps in Google Play or participating in Hangouts through Gmail. When counting only users who are using their Google+ news feeds, the number of active users is 135 million.

Previous
Like every new Windows release, Windows 8 is more secure than the operating systems that came before it. That's due in large part to three major enhancements: An increased emphasis on UEFI Secure Boot optimizations, the extension of the SmartScreen Filter across the operating system, and the default inclusion of a more robust version of Windows Defender, which now protects against all kinds of malware—not just spyware. Windows Defender's increased scope doesn't sit well with computer manufacturers, however. OEMs make beaucoup bucks by installing those trial versions of McAfee, Norton and other security suites you'll find bundled on boxed PCs. Windows Defender's default installation threatens that gravy train. Microsoft tossed its partners a bone by allowing OEMs to deactivate Windows Defender in order to ship boxed PCs with alternative security solutions installed. That's all well and good from a "variety is the spice of life" perspective, but one side-effect that isn't so hot is what happens when you fail to register that third-party security software: Windows 8 doesn't automatically reactivate Windows Defender by default. In other words, your pretty new prepackaged PC is wide open and vulnerable to all the nasties of the 'Net. Fortunately, activating Windows Defender is a snap. Here's how to do it. Activate Windows Defender in Windows 8 Windows Defender isn't subtle about being deactivated. First, head to the modern-style Start screen and type "Windows Defender" to have Windows search for the program, then click on the Windows Defender icon when it appears in the results. A Windows Defender window will appear on the classic desktop. If Microsoft's security software is disabled, you'll seen a lot of scary red tones alongside an "At risk" warning and an image of a computer screen with a big X on it. Subtle, eh? Next, click on the Settings tab at the top of the window. Make sure "Real-time protection" is selected in the left pane, then check the box next to "Turn on real-time protection (recommended)." Finally, click Save Changes at the bottom of the Window. How you want your Settings tab to look! You'll know it worked when the terrifying red "At risk" bar at the top of the Windows turns a much more soothing shade of green and switches to "PC Status: Protected." Check for leaks You're not quite done yet. Now it's time to make sure your PC is actually malware-free! Click the Update tab, then click on the big Update button in the middle of the Window to download the latest malware definitions Microsoft has on file. Next, open the Home tab and select the "Full" radio button in the Scan Options list. All you have to do now is click Scan Now, then sit back and wait while Windows Defender checks the nooks and crannies of your PC for any hidden baddies. Grab a cup of coffee; it may take some time. While you're waiting, we recommend checking out your Windows 8 antivirus options. Ah, that's what you want to see.

ConversionConversion EmoticonEmoticon

:)
:(
=(
^_^
:D
=D
=)D
|o|
@@,
;)
:-bd
:-d
:p
:ng