Businesses of all sizes need tools for remotely monitoring and maintaining multiple PCs simultaneously—and today we show PC enthusiasts and amateur efficiency experts (read: lazy people) how to use these tools for their own purposes.
If you have a smartphone in your pocket, a data plan, and a few computers that need monitoring, you can set up a convenient PC remote management system that lets you check on your PCs from anywhere, saving you time, money, and (potentially) your business.
Get started
A mind-boggling array of remote PC management software is available, but this guide focuses on installing and using an excellent tool called PC Monitor from MMSoft Design Ltd. IPC Monitor is designed to help you administer a few systems from any smartphone or tablet that has a live Internet connection. PC Monitor is available for mobile devices running Apple’s iOS, Google’s Android, or Microsoft’s Windows Phone operating systems. Companion applications for the PC are available for Windows, Mac OS X, or Linux.PC Monitor is free to use on up to three PCs. MMSoft will sell licenses to end users who want to monitor more than three systems from a single account; the company also markets its PC Monitor Enterprise Server, which can be hosted on an internal network. The free mobile app and its PC counterparts are full-featured and immensely useful, but only on systems that maintain an active connection to the Web; both the PC and the mobile components of PC Monitor require access to MMSoft’s servers in order to interface with each other.
Installing and configuring PC Monitor takes only a few steps—and if you don’t customize the notifications, rules, and monitors, you can complete the installation in minutes. For our description of the process, we use an Android-based tablet and Windows 7-based PCs, but the steps are virtually identical across all platforms.
Install PC Monitor on your systems

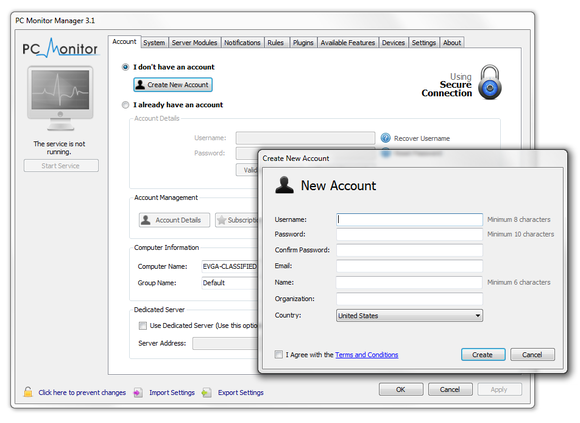
After the installation is complete, run the PC Monitor Manager application. The first time you launch the PC Monitor Manger, it will prompt you to create an account. That account is crucial for connecting your PCs to your mobile devices (or for monitoring your systems through PC Monitor’s Web interface, accessible from MMSoft's website). After you submit your contact information, MMSoft will send a validation code to your email address. Enter the validation code to authenticate the account, click OK to close the window, and then click OK in the PC Monitor Manager application window to log in and start the PC Monitor service.
On the initial account screen, you can enter a computer name and a group name for the system. By default the full Windows computer name is used, along with the group name 'Default'.
Customize your counters

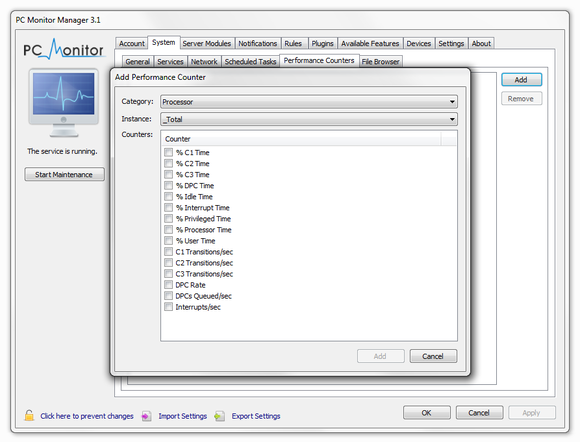
If you’d like to configure custom monitors or counters—say, for CPU utilization or to track a particular service—this is a good time to perform that task. Click the System tab at the top of the PC Monitor Manager window, and work your way through the subsequent tabs listed in the main interface. The General tab contains a basic list of permissible commands. The Services tab lists all services installed on the system; you can monitor any item on this list by ticking the box next to the service’s name. The Network tab lets you monitor network interfaces, ports, and performance. And the Scheduled Tasks tab, like the Services tab, invites you to enable the monitor simply by ticking a task. Under the Performance Counters tab, you can set up custom counters based on criteria that you specify. Click the Add button in the right-pane of the Performance Counters tab; and then, in the resulting pop-up window, configure the category, instance, and specific counter.
Set up notification alerts

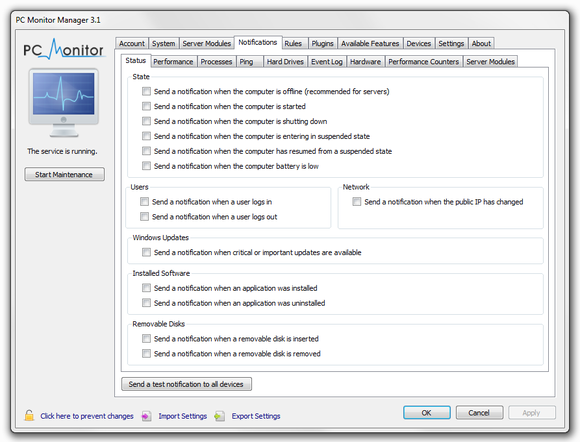
In many instances, enabling alerts in the PC Monitor Manager involves nothing more than ticking various options listed on the tabs available under the Notification menu. More-advanced notification options may entail manually setting up rules to trigger a notification. The process for setting up a notification alert is similar to the one for configuring a custom counter. First, tick the box labeled Send a notification when one of these conditions are met; then click the Add button, and specify the relevant conditions in the resulting window.
Grab the PC Monitor mobile app


Select a PC

Monitor your PC from your couch
If you’ve enabled notifications, and the PC Monitor desktop and mobile applications are communicating properly, all that remains for you to do is to explore the mobile app to monitor and manage your systems. PC Monitor will send notification alerts if necessary, of course, but the mobile app also provides a host of data in real time.After you tap a system name in the left pane of the app, the right pane will become populated with system details and buttons for performing various tasks, such as opening a command prompt, checking for OS updates, or restarting the system. You can also use the PC Monitor mobile app to send messages back to the associate desktop PCs, if you want to alert a user sitting in front of the machine about an issue.

Since PC Monitor is free to run on up to three systems for personal use, there’s little reason not to give it a shot. If you have a compatible mobile device and some systems that you’d like to monitor remotely, you can have PC Monitor downloaded, installed, and running in a matter of minutes.
Sign up here with your email

ConversionConversion EmoticonEmoticon